
12C: Master Pages Activity
Overview
Working with multi-page documents can be time consuming, but if you use Master Pages, you can make a change to one page and will update all your pages at once! The activity on paragraph styles last week, helped you understand how to make universal edits to all the typography in your document. This activity will show you how to make a design template (master page) in InDesign that will streamline your layout.
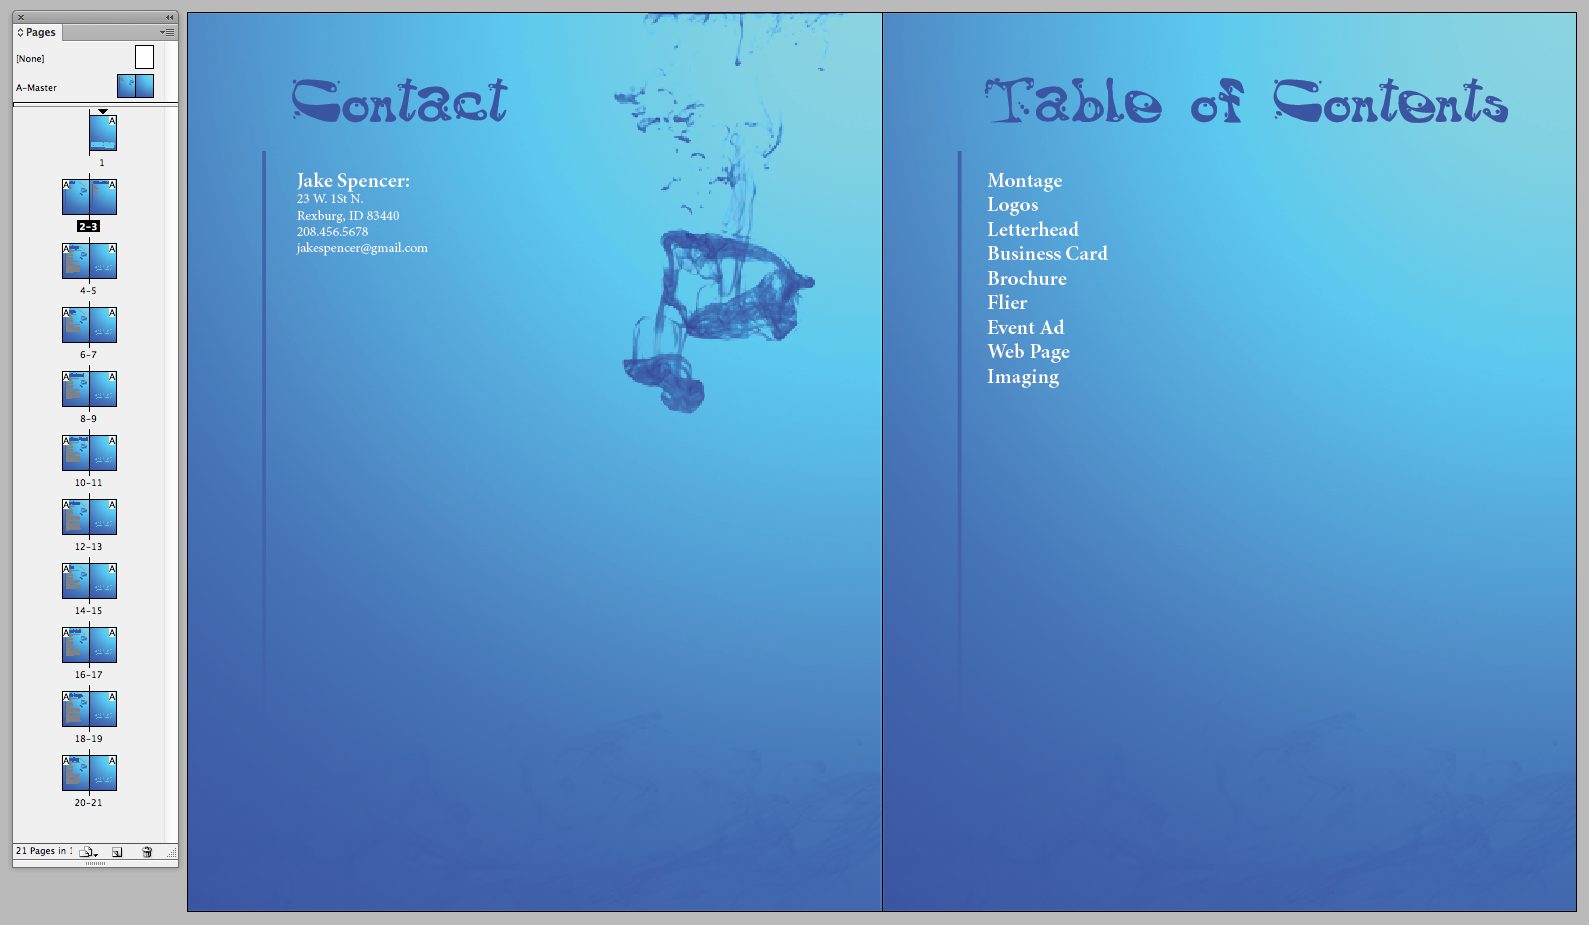
Activity Example (click to enlarge)
Preparation
READING: Read the 13A portfolio so you will understand the project.
Instructions
1. DOWNLOAD THE ACTIVITY
Click here to download. This package has all the images and files for this activity.
2. OPEN INDESIGN FILE
Open the InDesign file named “12CYourName.indd”. Open the .idml file if you don’t have CS6. You will notice that the first spread (Contact & Table of Contents pages) has a design on the background. This design is a Photoshop file that has been placed into InDesign. Always design the pages before you create them into Master Pages.
3. CONVERT DESIGN TO MASTER PAGES
- Select both backgrounds and the line on the Contact page.
- Choose “Edit” – “Cut” from the top menu. This will remove the design from the screen and copy it to your computer’s clipboard. DON’T just “copy” the design to the clipboard.
- Open the “Pages” window (“Window” – “Pages”)
- Double click on the first of the two white boxes to the right of the label “A-Master” at the top of the Pages window. This will open the master pages.
- From the top menu select “Edit” – “Paste in Place” (shortcut: CMD + Option + Shift + V)
- Back in the “Pages” window, double click on one of the pages in your document (below the “A-Master” page.) Notice that the design is now displayed on all of the pages.
- Again, double click on one of the two white boxes to the right of the label “A-Master” to open the master pages.
- Move the line to the left side of the left page to match the positioning in the activity example (above).
- Back in the “Pages” window, double click on one of the pages in your document (below the “A-Master” page.) Notice that the line position has been updated on all of the pages.
- Ensure that the table of contents page is the only page on the right that has a blue line. If every page on the right as a blue line, remove the line on the right page of the master.
- In the “Pages” window, click and drag the pages into their correct order. The pages are listed in the correct order on the table of contents page. The first three pages are in the correct order (Cover, Contact & Table of Contents). Note that every project description page will be on the left side. There will also be an “INSERT project” page on the right side, following every project description page.
4. SAVE
When you are finished select “File” – “Save As” and name your file “12CYourName.indd.” Example: “12CJakeSpencer.” Tip: Choosing “Save as” instead of just “Save” will clear out unnecessary data. If you only use the “Save” feature and continue to make alterations, your file will continually increase in size.
5. PACKAGE
Go to “File – Package.” Click “Package.” A “printing instructions” dialog box will appear. This is only necessary for future design work that will be printed at professional copy shops. You can click “continue.” Select a location and click “package.” InDesign will create a folder which includes the InDesign file, document fonts, and document links.
6. CHECK FOLDER
Double-check that the packaged folder has the following:
• .indd file named “12CYourName.indd.” Example: “12CJakeSpencer”
• “Document fonts” folder with font files used in the document inside
• “Links” folder with images inside
7. ZIP FOLDER
Right-click the folder and choose “compress” on Mac and “zip” on PC.
8. SUBMISSION
Go to 12C Submission and upload your .zip file. Once you have attached the file, click on it to make sure the file opens correctly before you submit it. Hit “Submit to Dropbox”.
Tutorials
Instructional Video (click to view)
